You can bypass the internet requirement for Windows 11 setup by opening a command prompt on the “Let’s connect you to a network” screen (Shift + F10) and running oobe\bypassnro. Your PC restarts, the setup screen gets a new “I don’t have internet” link, and you’re back to a local account, no Microsoft sign-in required.
That single command is the whole trick for most people. The rest of this guide covers what to do when it doesn’t work, what you actually lose by going local, and how to undo the decision later if you change your mind.
Why Windows 11’s internet requirement exists in the first place
There is no technical reason a fresh Windows 11 install needs internet access or a Microsoft account. Windows has installed offline since 1995. This is a product decision, not an engineering limitation.
Microsoft’s own explanation is “a better out-of-box experience,” which is corporate for: an account means telemetry tied to a real identity, a login for the Microsoft Store and OneDrive, and a much harder sell for local accounts, which don’t generate any of that.
The requirement started with Windows 11 Home in the 22H2 update. It now applies to Pro as well, on both clean installs and the reset/refresh flow. Enterprise and Education editions are unaffected, and if you’re joining a domain during setup, you never hit this screen at all.
None of that makes the account mandatory. It makes it the default, and defaults are exactly what a bypass command exists to skip.
Method 1: BypassNRO (the one to try first)
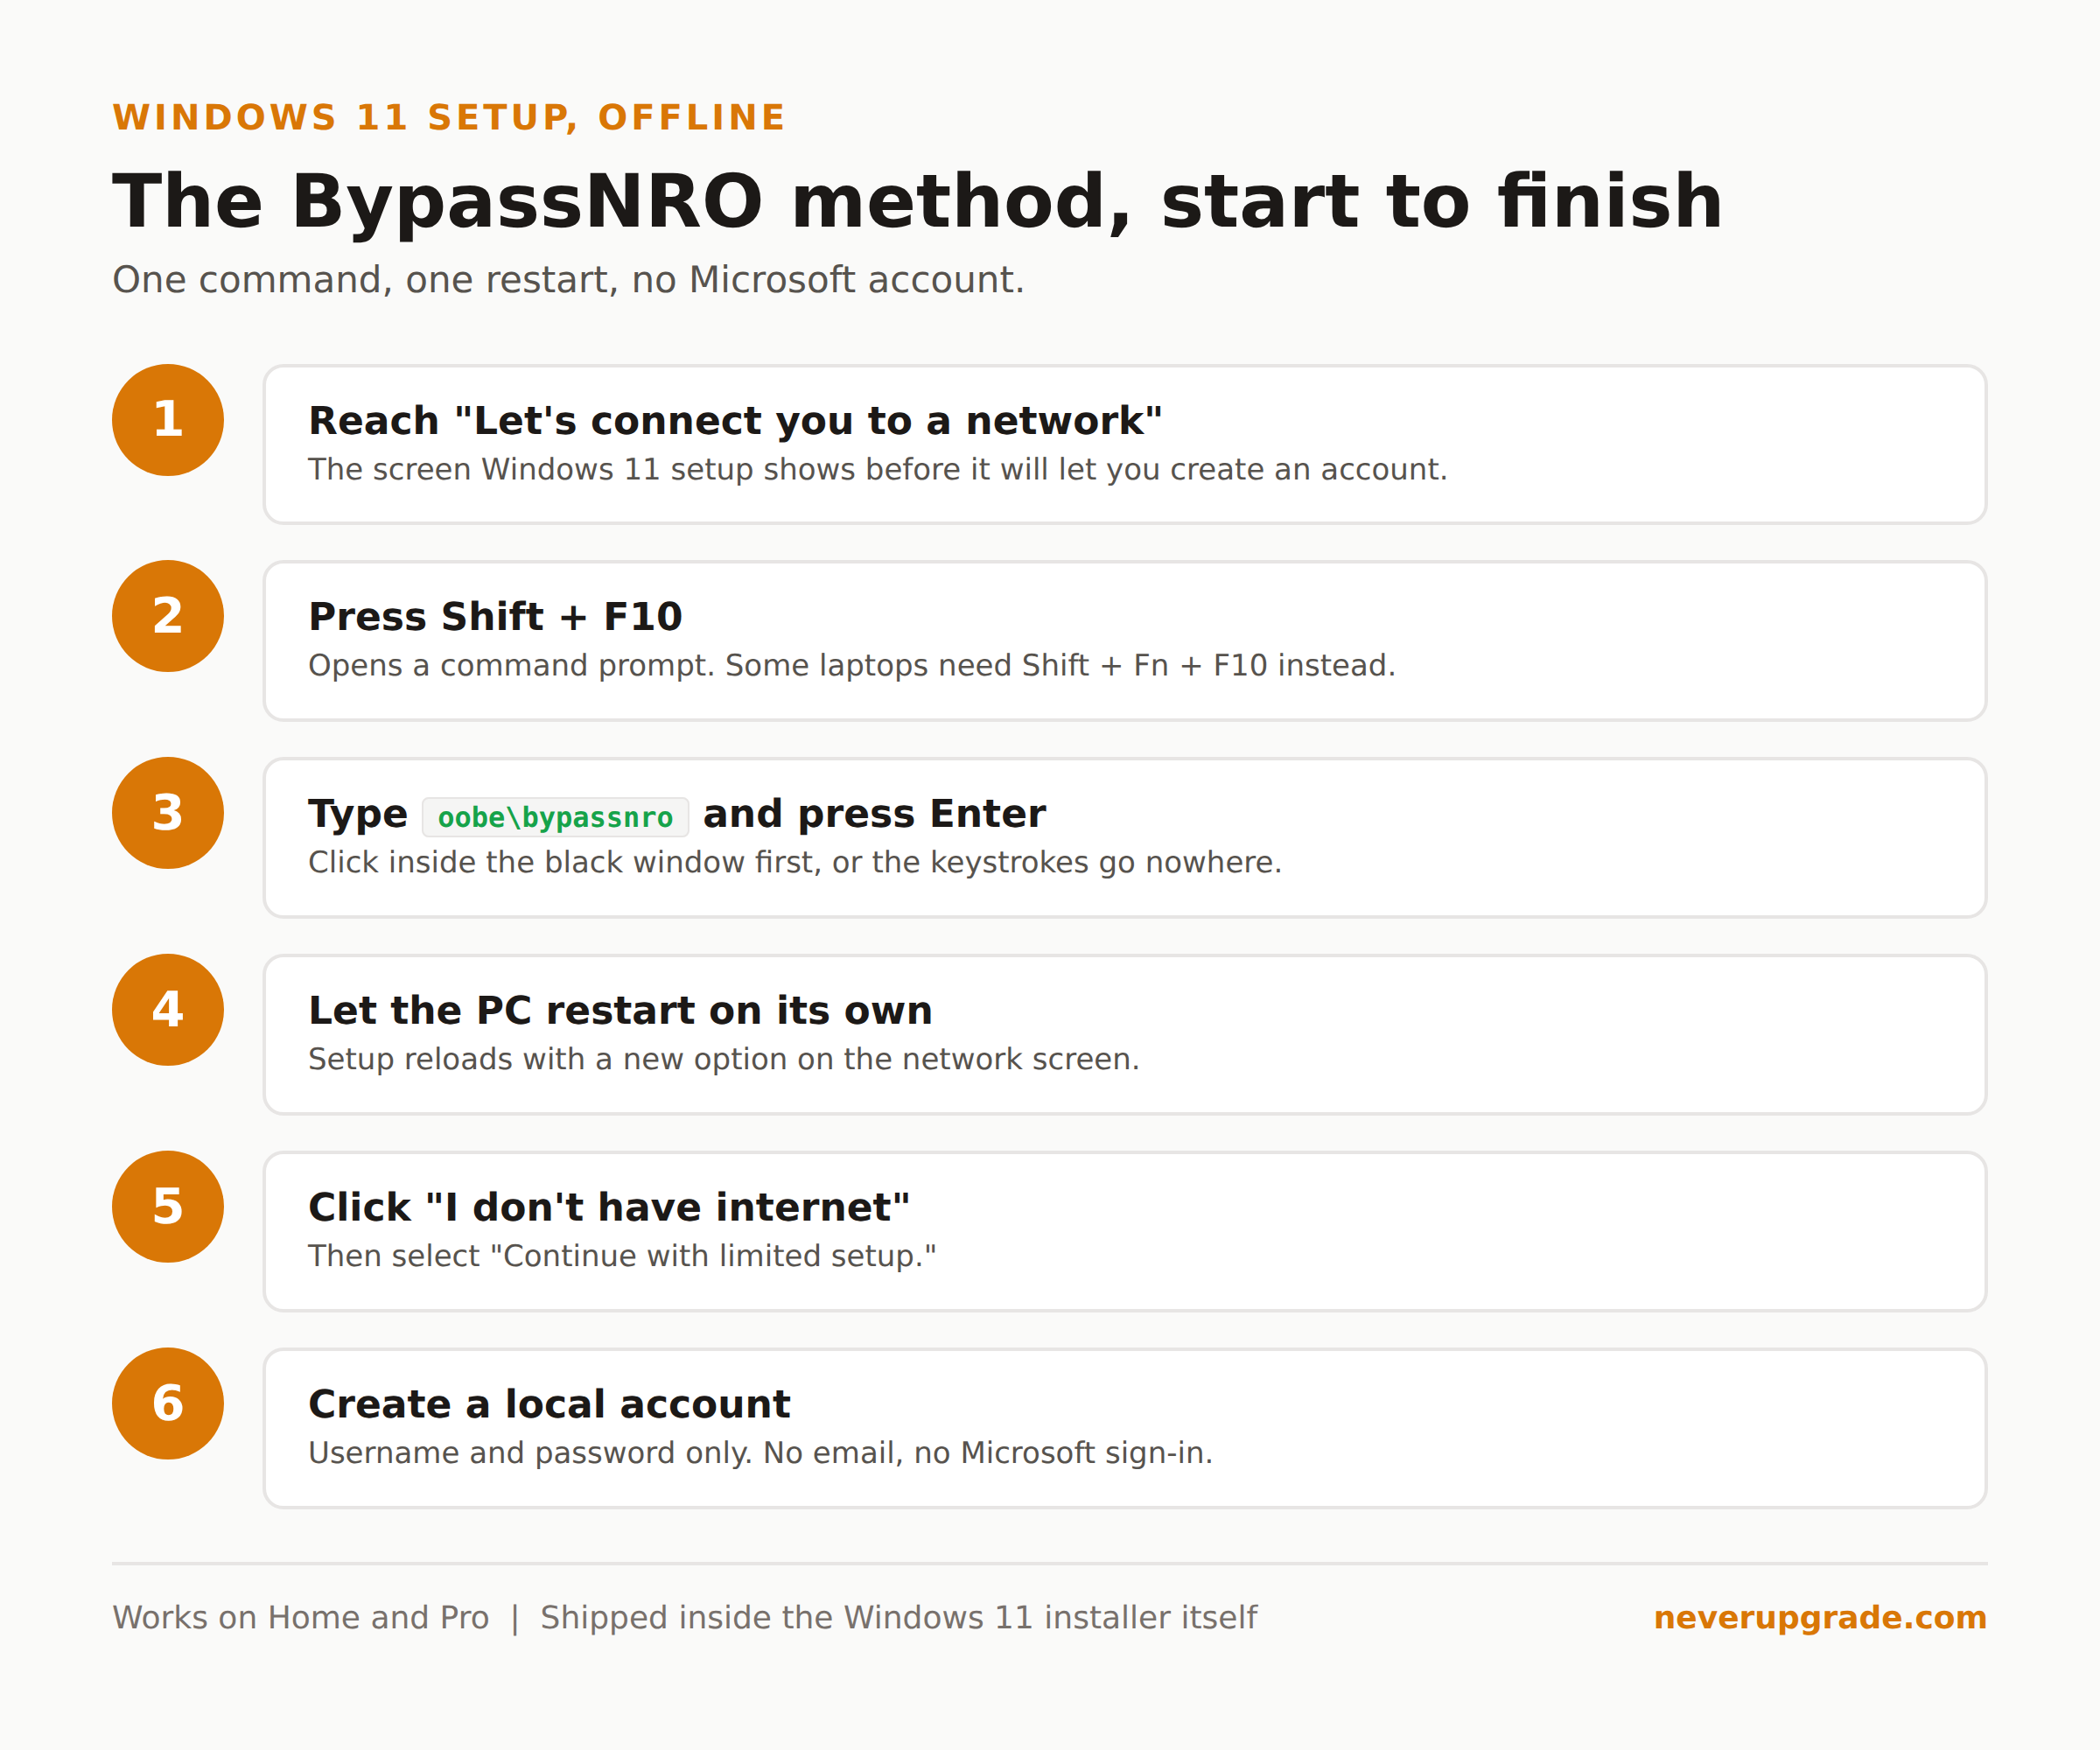
NRO stands for “network requirement override,” and it’s a script Microsoft ships inside the Windows 11 installer itself, not a hack you install.
Before you start: this only works during setup, before you’ve created any account. If you’ve already got a Microsoft account attached to a running install, skip to the “switching back to local” section below.
- Boot into Windows 11 setup (a fresh install or the “I don’t have internet” step already presented).
- On the screen titled Let’s connect you to a network, press Shift + F10. On some laptops this is Shift + Fn + F10.
- Click inside the black command prompt window so it has focus. Typing into an unfocused window does nothing and wastes ten minutes of your life.
- Type
oobe\bypassnroand press Enter. - The machine restarts on its own. Let it.
- Pick your region and keyboard layout again, same as before.
- On the network screen this time, you’ll see a new link: I don’t have internet. Click it.
- Select Continue with limited setup. You’ll now be prompted to create a local account: username, password, three security questions. No email address, no Microsoft sign-in.
That’s the entire Windows 11 local account setup path, no email address, no Microsoft sign-in. If it worked, you’re done, skip to “what you give up” below.
Method 2: The command-prompt fallback
Some OEM images, and some builds where Microsoft has tightened the screws, don’t accept bypassnro, or disable Shift + F10 outright. If the command above did nothing or the command prompt won’t open, try this instead.
- On the same Let’s connect you to a network screen, press Shift + F10 again.
- If the prompt opens this time, type:
start ms-cxh:localonlyand press Enter. - Confirm the prompt that appears. This drops you directly into offline account creation, no restart needed.
If Shift + F10 is blocked entirely (some enterprise-imaged OEM laptops do this), your remaining options are:
- Pull the network cable and turn off Wi-Fi before you boot into setup. Some builds, when they genuinely cannot detect a network, skip straight to a local-account prompt instead of forcing you to find one. It’s inconsistent between builds, but costs nothing to try first.
- Build your install media with Rufus. When you create a Windows 11 USB installer with Rufus, there’s a checkbox for “Remove requirement for an internet connection during setup” that patches the installer itself, so the network screen never appears at all. This is the most reliable route if you’re doing a clean install from USB anyway, since it sidesteps OOBE tricks completely rather than racing a command prompt against a ten-second setup screen.
- An unattended answer file (autounattend.xml). Overkill for a single PC, but if you’re imaging more than a couple of machines, an answer file can preseed the local account and skip OOBE screens entirely. Worth knowing exists; not worth building for one laptop.
What actually breaks if you go local
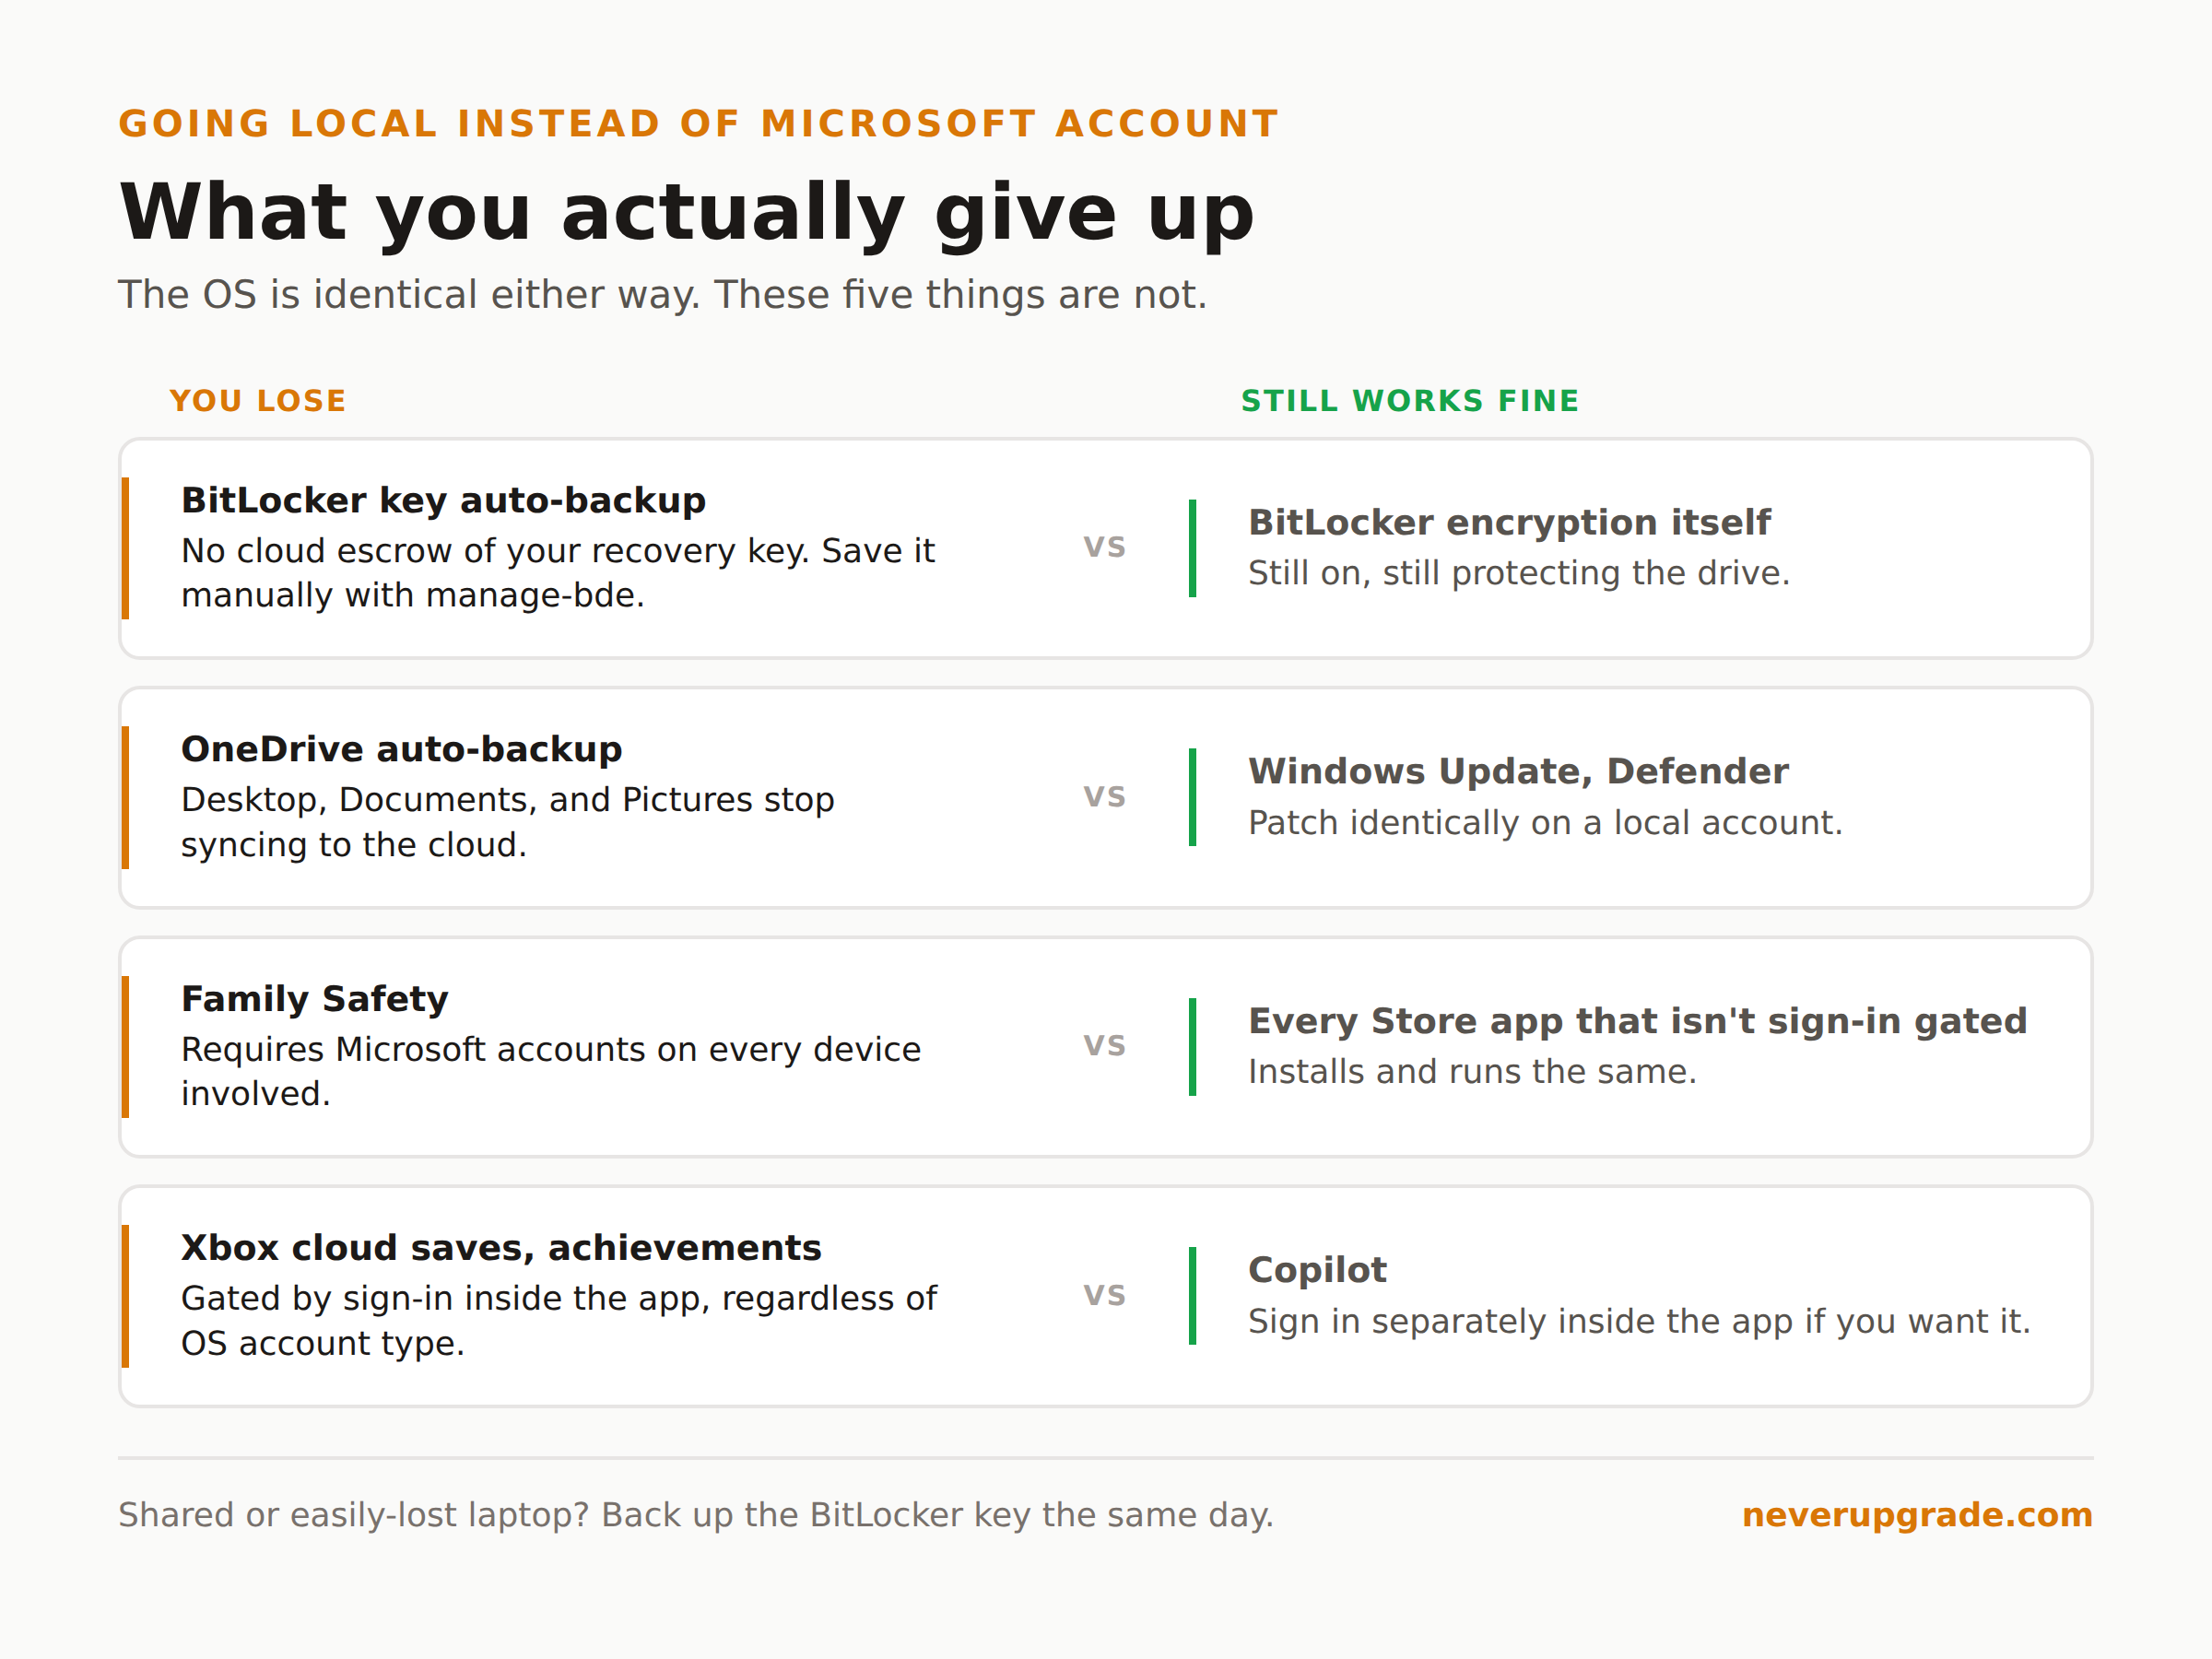
Nothing breaks the OS. Windows runs identically on a local account. What you lose is the stuff that depends on a Microsoft account existing:
- BitLocker recovery key escrow. If your device has BitLocker device encryption (most modern laptops do, silently, whether you asked for it or not), a Microsoft account is what normally backs up your recovery key to the cloud. Go local and there’s no automatic backup. If you ever get a recovery-key prompt after a firmware update or a dropped drive, and you never saved that key anywhere, your data is gone. Back it up manually the same day you finish setup:
manage-bde -protectors -get C:from an elevated prompt gives you the key to write down. - OneDrive backup and cross-device sync. No account, no automatic Documents/Desktop/Pictures backup, no settings syncing to another PC.
- Some Store apps and Xbox features. A handful of apps and all Xbox achievements/cloud saves require sign-in regardless of the account type on the OS itself, so you’ll get prompted inside those apps even with a local Windows account.
- Family Safety. Requires Microsoft accounts on both the parent and child side. Not available locally, full stop.
- Copilot. Sign-in-gated. A local Windows account doesn’t block you from signing into Copilot separately, it just means Windows itself isn’t the thing holding your identity.
None of this is a reason to add an account you don’t want. It’s a reason to know what you’re deliberately choosing not to have, so a missing BitLocker key isn’t a surprise six months from now.
The one case where you should genuinely reconsider: if this is a shared family machine, or a laptop that regularly leaves the house and could get lost or stolen, Find My Device and the automatic OneDrive backup are real safety nets. Going local is fine. Going local and skipping a manual backup plan is not.
Switching an existing Microsoft-account install back to local
Already set the machine up with a Microsoft account and want out? You don’t need to reinstall anything.
- Open Settings > Accounts > Your info.
- Click Sign in with a local account instead.
- Enter your current Microsoft account password to confirm, then set a username and password for the new local account.
- Sign out and back in.
Your files, apps, and settings stay put. What disappears is anything that was actually stored in the cloud rather than on the machine (OneDrive-synced folders stop syncing, for instance), so check your OneDrive folder is fully downloaded locally before you flip the switch.
FAQ
Does BypassNRO still work in 2026?
Yes, as of this writing it’s the officially shipped mechanism inside the Windows 11 setup files, not a workaround Microsoft is actively hunting down. It has occasionally stopped working in specific Insider preview builds before Microsoft restored it after backlash. If it fails on a retail build, try Method 2 above before assuming it’s gone for good.
Is bypassing the internet requirement actually safe?
Yes. You’re skipping an account sign-in step, not a security check. Windows Update, Defender, and firmware updates all work identically on a local account. The only “safety” feature you lose is the automatic BitLocker key backup covered above, and that has a five-minute manual fix.
Windows 11 setup won’t let me type into the command prompt after Shift + F10. What now?
Click directly inside the black window first; on some laptops, Shift + F10 opens the window but leaves keyboard focus on the setup screen behind it. If nothing opens at all, your OEM has likely disabled it at the image level. Skip to the Rufus method and rebuild your install USB instead of fighting the built-in installer.
If you’re setting this PC up specifically to keep running an older, fully licensed copy of Windows instead of Windows 11 at all, that’s also a legitimate option. See our guide on downgrading Windows 11 back to Windows 10 if the account prompt is one grievance too many.